how to draw 3d in photoshop cs6

Create Simple 3D Text In Photoshop
In this Photoshop text effects tutorial, nosotros'll learn how to create elementary 3D text:

The last 3D text result.
Let'due south get started!
Step 1: Create a New Document
To begin, permit's create a brand new Photoshop certificate. Get upwards to the File menu at the top of the screen and choose New, or for a quicker style, press the keyboard shortcut Ctrl+N (Win) / Control+N (Mac). Whichever way you choose, Photoshop pops upward the New Document dialog box. Enter the size you demand for your document. For this tutorial, I'm going to enter a Width of 6 inches, a Top of four inches, and a Resolution of 300 pixels/inch, which is a standard resolution for professional quality press. I'1000 as well going to set my Background Contents to White, which will set the groundwork colour of my new document to white. When you're done, click OK in the top correct corner of the dialog box to go out out of it. Your new Photoshop certificate will appear on the screen.
Create a new Photoshop document using the New Document dialog box.
Step ii: Select The Type Tool From Photoshop'due south Tools Palette
To add text to the certificate, we'll need to use Photoshop'due south Type Tool. Select it from the Tools palette, or printing the letter T on your keyboard to select it with the shortcut:
Select the Type Tool.
Footstep iii: Cull A Font From The Options Bar
Next, we demand to choose a font. With the Blazon Tool selected, you'll observe that the Options Bar at the meridian of the screen has changed to show the options for the Type Tool. Choose whichever font you'd like to utilise from the list of fonts that yous currently accept available on your computer. This 3D outcome works best with fonts that have large, thick messages. I'm going to choose Touch on. You tin can too choose a size for your text if you like, simply it'southward not really necessary at this point since we can easily modify the size of the text later, as we'll see. For now, all we need is the font:

Choose a font from the Options Bar.
Pace 4: Choose A Color For Your Text
Adjacent, we need to choose a color for our text. If you await farther to the correct in the Options Bar, you'll encounter a colour swatch. The color swatch shows the current text color. To change the color, merely click on the colour swatch:

Modify the color of the text by clicking on the color swatch in the Options Bar.
This volition bring upwards Photoshop'south Colour Picker. Choose whichever colour you'd similar to apply for your text. I'm going to select a vivid shade of cerise. When you're done, click OK in the top right corner of the Color Picker to exit out of it:
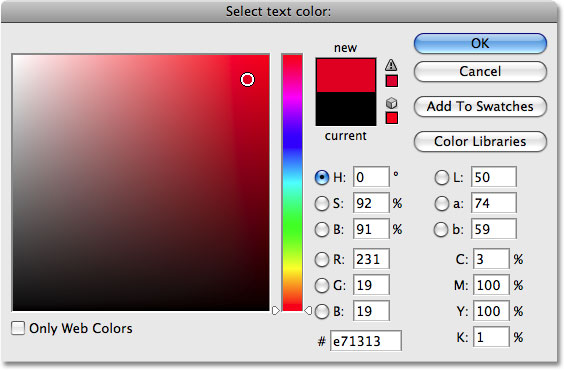
Choose a new color for the text from the Color Picker, then click OK to exit out of it.
The color swatch in the Options Bar will change to show the color yous've selected.
Step 5: Add Your Text To The Document
With our font and text color selected, click inside the certificate and add together your text. I'm going to type "PHOTOSHOP", all in majuscule messages to enhance the outcome. Don't worry if the text appears too large or too minor for now. Nosotros can set that in a moment:
Click within the certificate and add your text.
When yous're done typing, click on the checkmark in the Options Bar to take the text and exit out of text editing mode:

Exit out of text editing way by clicking on the checkmark in the Options Bar.
If we look at our Layers palette, nosotros can see that Photoshop has conveniently placed our text on its own layer above the Groundwork layer. This is what will allow united states of america to work with the text independently from the white groundwork behind it:
The text appears on its own layer in the Layers palette.
Step 6: Resize The Type If Needed
If your observe that your text is too small (or too large), we can hands fix that using Photoshop's Free Transform command. Outset, make certain your text layer is selected in the Layers palette (selected layers are highlighted in bluish). Then go upwards to the Edit menu at the top of the screen and choose Free Transform. You lot can also select the Complimentary Transform command with the keyboard shortcut Ctrl+T (Win) / Command+T (Mac):
Select "Free Transform" from the Edit card.
You lot'll see the Free Transform box and handles appear around your text in the certificate. To resize the text, concur down your Shift fundamental, then click any of the corner handles (the little squares) and drag the corner inward to make the text smaller or outward to make information technology larger. Property the Shift key downwardly every bit you drag constrains the aspect ratio so you don't accidentally distort the shape of the text as you lot're resizing it. I'm going to make my text merely a little chip bigger by dragging the handle in the bottom right corner outward. You tin also move the text if you need to by clicking anywhere inside of the Complimentary Transform box and dragging the text to a new location inside the document:
Resize and motion the text as needed with Gratuitous Transform.
When you're done, press Enter (Win) / Render (Mac) to take the modify and exit out of the Free Transform command.
Stride 7: Convert The Text To A Shape
To create our 3D effect, we demand to alter the perspective of our text. At that place's merely one problem though. Photoshop doesn't allow us to alter the perspective of text (meet how that can be a trouble?). To show you what I mean, make sure y'all notwithstanding accept the text layer selected, and so go up to the Edit carte at the peak of the screen and select Transform from the list. A secondary card will appear showing all the various ways we tin can transform the contents of the layer nosotros currently have selected. Find how the Misconstrue and Perspective options are grayed out? That means they're currently unavailable to us, and that'southward considering Photoshop can't perform either of these 2 types of transformations on text.
The solution is to convert our text layer into what'south called a shape layer. By converting the text to a shape, nosotros'll be able to change the perspective of it and create our upshot. The only downside to converting text to a shape is that the type will no longer be editable. In this case though, since nosotros take no need to edit our text, nosotros don't need to worry well-nigh information technology.
With the text layer still selected, get up to the Layer menu at the top of the screen, choose Type, and so cull Convert to Shape:
Get to Layer > Blazon > Convert to Shape.
If we await in the Layers palette, nosotros tin encounter that the text layer now looks completely different, and that's because it's no longer a text layer. Photoshop has converted it to a shape layer, which means we're at present free to apply a Perspective transformation to information technology and create our 3D text effect:
The text layer has been converted to a shape layer.
Step viii: Change The Perspective
Become back up to the Edit menu. You lot'll see that the Transform option we looked at a moment ago has been replaced with a new option named Transform Path. Again, that'southward because we're dealing now with a shape. Choose Transform Path from the list. When the secondary menu appears, you'll come across that both the Distort and Perspective options are now available. Choose Perspective from the list:
Go to Edit > Transform Path > Perspective.
The aforementioned box and handles that we saw earlier when we selected the Free Transform control will appear around the text (shape). The difference is, we're now working in Perspective way. To change the perspective of the text and give it a 3 dimensional expect, simply click on the handle in the bottom right corner and drag it straight downward. Equally yous drag, the elevation of the right side of the text will increase from its middle, while the left side volition remain unchanged:
Click on the bottom right corner handle and drag downward.
When you're happy with the perspective shift, press Enter (Win) / Render (Mac) to accept the transformation. Your text should at present wait something like this:

The text now appears with a 3D perspective.
Step nine: Create Multiple Copies Of The Shape Layer, Each One Moved Slightly Farther To The Right
This side by side step is the fun part. Nosotros're going to very quickly create multiple copies of our shape layer, each i moved one pixel further to the correct from the previous ane. This will requite our letters some depth. First, select the Move Too50 from the Tools palette, or just printing the letter Five on your keyboard to select information technology with the shortcut. This fox only works with the Move Tool selected:
Select the Move Tool.
With the Move Tool selected and the shape layer selected in the Layers palette, hold downward your Alt (Win) / Pick (Mac) primal and printing the correct arrow primal on your keyboard. Then printing information technology again. Then once again. And again. Notice what's happening? Each time you printing the correct pointer key with the Alt / Option key held down, yous're creating a new copy of the shape layer and you're moving the new copy one pixel over to the right. Belongings down Alt / Option tells Photoshop to create a new copy of the shape each time rather than merely moving the existing shape. The more times you press the correct arrow primal, the more copies of the layer you'll create, and the more depth we give to our letters.
Continue pressing the correct arrow central until you're happy with the results. In my instance, I pressed the arrow fundamental a total of 68 times, creating 68 copies of my shape, each ane moved ane pixel further to the correct. The number of times y'all press the arrow key will depend on the resolution of the document you're working with. When you're done, your text should look something like this:

Hold down Alt (Win) / Option (Mac), then printing the Right pointer cardinal multiple times to give the letters depth.
Step ten: Move The Original Shape Layer To The Top Of The Layer Stack In The Layers Palette
Each time we created a new re-create of our shape, we created a new shape layer in the Layers palette, and Photoshop placed each new layer directly in a higher place the previous layer. In my case, my Layers palette now contains 68 copies of my original shape layer. The original shape layer is sitting above the Background layer, with all the copies piled on top of information technology. You can tell it's the original because it's the only shape layer that doesn't contain the word "copy" in its proper name.
We need to motion that original layer to the very top of the pile, and there's an easy way to do it. Showtime, click on the original layer in the Layers palette to select it. So, press Ctrl+Shift+] (Win) / Command+Shift+] (Mac). That's the right subclass central ("]") in case you're wondering. This convenient shortcut volition instantly movement the currently selected layer straight to the top of the layer stack:
The original shape layer now appears above the other layers in the Layers palette.
Step xi: Merge All The Copies Together
With our original layer now at the very top of the layer stack, we need to merge all of those copies of the shape layer down to one layer. Click on the layer directly beneath the original layer in the Layers palette (in other words, the second layer from the superlative). Then utilize the scroll bar on the right of the Layers palette to coil down to the layer direct above the Background layer. Don't but click on information technology though to select it considering that will deselect the layer you just selected at the top. Instead, concur downward the Shift key on the keyboard and then click on the layer to select it. This will select both layers at the same time, along with every layer in between them. All of these layers will appear highlighted in blue in the Layers palette.
With all of our copied layers at present selected, get upwardly to the Layer carte at the top of the screen and choose Merge Layers down near the lesser of the list. Or for a faster mode, press the keyboard shortcut Ctrl+E (Win) / Command+E (Mac):

Go to Layer > Merge Layers.
Photoshop will merge all of the selected layers into a single layer. If we wait in our Layers palette, we tin can run across that we now have only three layers. The Background layer is on the bottom, the original shape layer is on the tiptop, and in betwixt them is our newly merged layer:
All of the shape layer copies take been merged into a single layer.
Step 12: Add A Blackness-To-White Slope To The Merged Layer
To give our letters a truly 3D appearance, let's complete things by calculation a simple lighting event. Or at to the lowest degree, something that looks similar a lighting effect. Click on the merged layer in the Layers palette to select it if it'southward not selected already. Then click on the Layer Styles icon at the bottom of the Layers palette. A listing of all the available layer styles will appear. Click on Slope Overlay to select it:
Select a Gradient Overlay layer way from the bottom of the Layers palette.
This will bring upwardly Photoshop'south Layer Style dialog box ready to the Gradient Overlay options in the middle column. Nosotros want to use a black to white slope for our fake lighting effect. If you already accept the blackness to white gradient selected, you can skip this next step. If you have another gradient selected, click on the slope preview expanse in the heart of the options:
Click on the gradient preview expanse in the Layer Way dialog box to choose a new gradient.
This brings up the Slope Picker, showing us all the available gradients we can choose from. The 1 we want is the Black, White gradient, third from the left, top row. If you lot have Tool Tips enabled in Photoshop'southward Preferences, you'll run across the name of the gradient appear when you hover over the thumbnail. Click on it to select it, and then click OK in the top right corner to have information technology:
Choose the Black, White gradient.
Dorsum in the principal Gradient Overlay options, you'll see the slope preview area at present showing the black to white gradient (if it wasn't already). Beneath it are a couple of important options. Make certain the Style option is set to Linear and the gradient Angle is fix to 90°:
Make certain the Style option is gear up to Linear and that the Bending is set to ninety°.
Click OK when y'all're done to leave out of the Layer Way dialog box, and we're done! Photoshop applies the black to white gradient to the merged layer, creating a shadow effect on the letters and completing our uncomplicated 3D text outcome:
The final 3D text effect.
Where to go next...
And there we have information technology! Check out our Text Effects or Photograph Furnishings sections for more Photoshop furnishings tutorials!
Other Stuff
© 2022 Photoshop Essentials.com.
For inspiration, not duplication.
Site design by Steve Patterson.
Photoshop is a trademark of Adobe Systems Inc.
Source: https://www.photoshopessentials.com/photoshop-text/text-effects/photoshop-simple-3d-type/
0 Response to "how to draw 3d in photoshop cs6"
Post a Comment